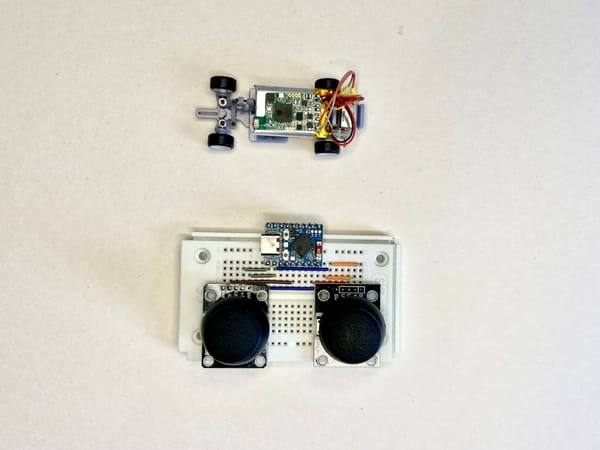
Car module for RC cars and other battery-powered models / toys / robots

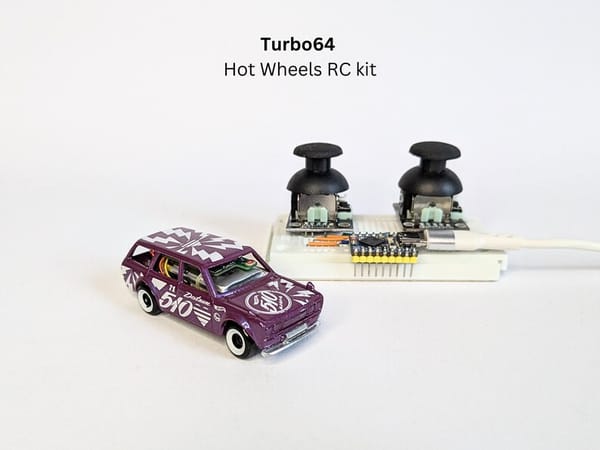
Today, we're excited to announce our modules for remote-controlled battery-powered cars and other vehicles, such as cars for train layouts, city layouts, boats, and cranes. We'll delve into how to use these car modules for various models and toys in our future posts. But today, I want to discuss the problems we aim to solve with this board and the main features that will help you create more interactive projects with less effort and more joy. You can find our car module available at our online store.
What problem are we addressing with this board?
It's simple - the problem is how to create remote-controlled cars and other battery-powered devices with DC motors, servos, and sound without dealing with electronics complexity. Some might argue that they can easily build RC cars with electronics from local shops or Aliexpress, and that's true. However, wouldn't it be much better and easier to have a small circuit (15mm x 30mm) that contains everything you need for your car? This includes DC motor drivers, servo drivers, sound, WiFi/BLE connectivity, ready-to-use Arduino firmware that you can modify, schematics for remote controllers with firmware, and the ability to control vehicles from a browser on any WiFi-enabled device. This is precisely what we integrate into our car modules (and other Loco.Engineering modules). You just need to solder or connect motors, speakers, and batteries to one small board, and the electronics part is ready in just 5 minutes. This means you can spend more time playing and creating more interesting projects. We're addressing a similar problem in railway modeling with our WCC modules. From our experience and conversations with modelers, setting up electronics on layouts takes up half the time or even more depending on layout complexity.
Main features of the RC car module
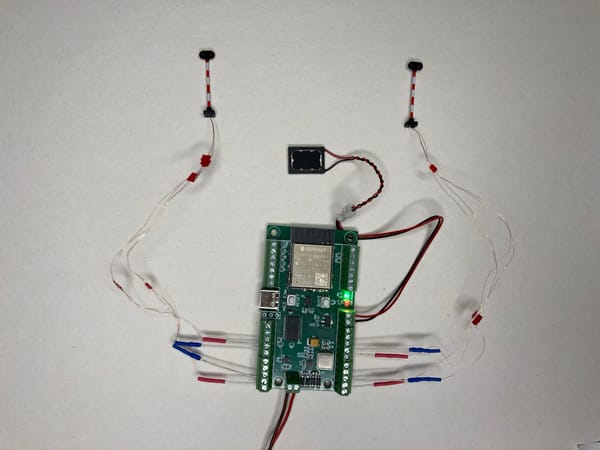
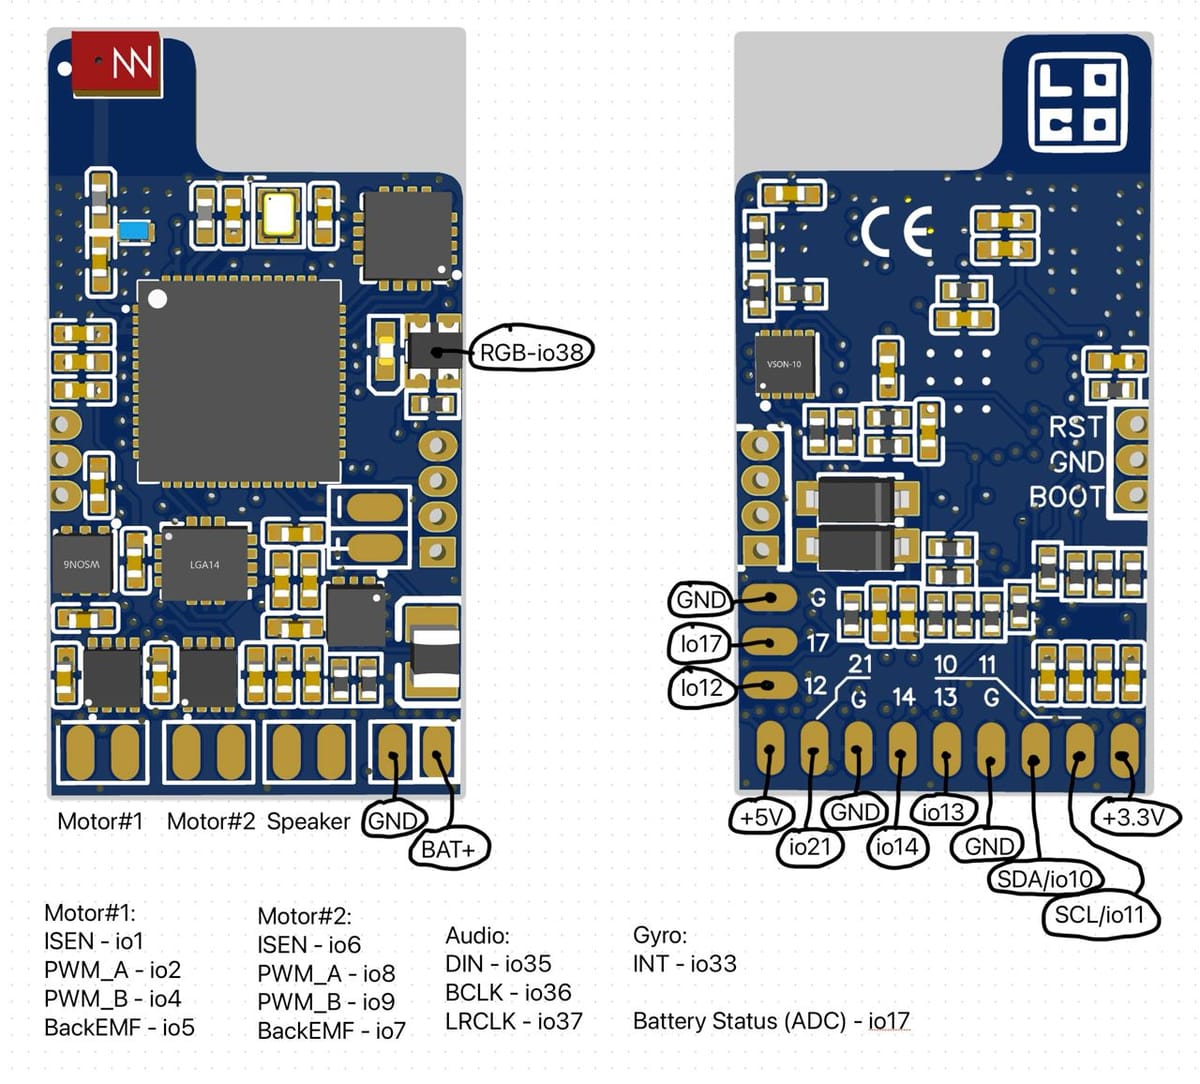
- Based on ESP32S3 - a dual-core XTensa LX7 MCU capable of running at 240 MHz with 4MB flash memory and 2MB RAM.
- Two modern DC motor drivers from Texas Instruments to control up to 2 DC motors and other loads, with a maximum current per motor of 3A and total current up to 4A. We've also integrated Back EMF and current sensing for more realistic physics.
- Control of multiple servo motors.
- The module and devices with the module can be controlled over WiFi/BLE from custom remote controllers based on ESP32S3/C3 SoCs or through a browser on mobile devices and computers.
- Built-in battery charging with battery level indication, eliminating the need for an additional battery circuit to connect li-poly and protected li-ion batteries.
- Built-in 5W audio amplifier - just connect a speaker and you can play sounds from your vehicle.
- Firmware based on Arduino and ESP-IDF with available source - https://github.com/loco-engineering/arduino-rc-car
- Schematic and firmware for a remote controller - https://github.com/loco-engineering/arduino-rc-car, with a kit containing all required components available in our online shop.
- 7 GPIOs with PWM to control lights and other loads.
- I2C, UART, and SPI for connecting external sensors such as gyroscopes, hall sensors, and others.
- 5V and 3.3V outputs.
- The smallest circuit with such a range of features available on the market. It fits even small vehicles in scale H0 or 1:87, with dimensions of 15mm x 27mm.
- Over-the-air updates.
- Weekly firmware updates.
- A web-based app to control cars and vehicles.
- Modules can communicate with each other, allowing for highly interactive layouts.
- Designed and produced in Europe.
- Available in two versions: bare circuit and with soldered wires.
- Costs less than buying development modules with components and soldering them together.
- Commercial license available for everyone, including small indie brands and manufacturers, with a small fee (2%) per each sold product with our hardware and firmware without any additional fixed and initial fees.
- Possibility to connect UWB (Ultra-wideband - https://en.wikipedia.org/wiki/Ultra-wideband) modules for indoor tracking with accuracy in a few centimeters.
- Possibility to connect an NFC reader.
- Removable USB type-C for charging and firmware uploading.
- Possibility to connect your own charging module, for example, wireless charging.
- No vendor lock-in; you can change the firmware as you want.
What RC models and toys can you build with this module?
- Cars, buses, and other vehicles for your train or city layout in scales 1:160 (N), 1:87 (H0), and larger.
- RC cars with a brushed DC motor, steering powered by a servo motor, and realistic physics.
- Remote-controlled battery-powered vehicles such as cranes, boats, buses, and trains.
- Robots.
How to control a car/vehicle with the Loco.Engineering car module
- Using a remote controller over ESP-NOW. Firmware and schematic examples with 2 joysticks powered from a battery are available in our git repository. The kit with all required components to build a remote controller is available at our online shop.
- Over WiFi from a browser on a mobile device or computer.
- Over BLE from a browser on a mobile device or computer.
- Over USB from a computer (on our roadmap, expected release in June).
How to get started
We recommend checking the entire electronics setup before installing it in the final toy/model/robot. To start using our car, follow these easy steps:
- Order a Loco.Engineering car module.
- (Optional if you haven’t and if your project requires) Order a DC motor, servo motor, 3.6V protected battery (for example), speaker, axles, wheels, gears, and other components for your toy/model/robot.
- Receive the car module and connect/solder wires from motors and the speaker.
- We ship the module with preinstalled firmware so you can start using it after connecting motors and the battery.
- Connect a battery and check that a status LED on the module flashes in blue.
- Open WiFi settings on any computer or device and connect to a network with a name like “Loco-xxxxxx”.
- Open a browser on that device/computer and go to http://loco.local. Click/tap on buttons to check that motors work.
That’s it. Follow guides in our Knowledge Base to add your custom logic to the firmware and upload it to your module. Feel free to contact us at hey@loco.engineering if you have any questions or feedback.